
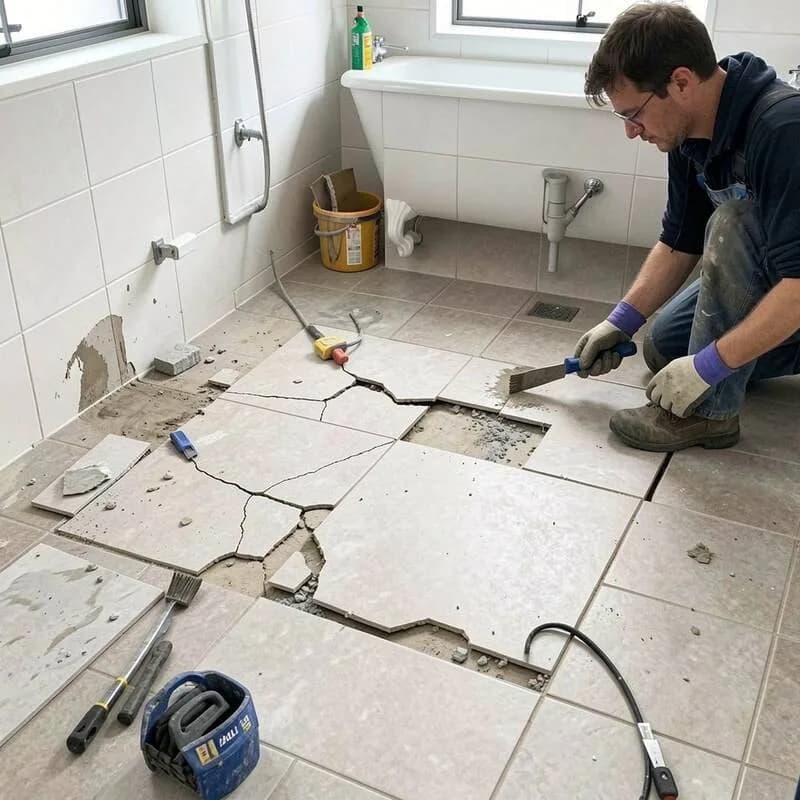
Not every tile problem in a Melbourne home requires a full renovation. A cracked bathroom tile, a loose section on a kitchen floor, grout that has gone black and crumbling between shower tiles, or a silicone joint that has pulled away from the benchtop — these are repair jobs, not replacement projects. Addressing them promptly with the right repair approach costs a fraction of what full retiling would, extends the life of the surrounding installation, and stops a minor problem from becoming a structural one.
This guide covers the four most common tile repair situations Melbourne homeowners encounter: cracked or broken tiles, hollow and loose tiles, failed grout, and failed silicone joints. For each, we explain what causes the problem, how serious it is, whether repair or replacement is the right approach, and what the repair process actually involves. We also cover costs and what to look for when engaging a Melbourne tile repair specialist.
The Four Main Tile Problems in Melbourne Homes
| Problem | What It Looks Like | Urgency | Typical Cause |
|---|---|---|---|
| Cracked tile | Visible crack across one or more tiles — hairline to full break | Medium to high — water ingress risk in wet areas | Impact damage, substrate movement, inadequate adhesive coverage, or thermal stress |
| Hollow tile | Tile sounds hollow when tapped — a dull thud instead of a solid ring | Medium — will eventually debond and crack or lift | Insufficient adhesive coverage at installation, substrate movement, or adhesive failure over time |
| Failed grout | Grout crumbling, cracking, missing, or heavily stained/discoloured | Medium — water ingress risk when missing in wet areas | Age, movement, wrong grout product for location, or inadequate original installation |
| Failed silicone | Silicone joint pulling away, cracking, going black with mould, or missing | High in wet areas — direct water ingress pathway | Age, movement, poor original adhesion, or wrong silicone product used at installation |
The urgency of each problem changes significantly depending on whether it is in a wet area. A cracked tile in a dry living area is an aesthetic problem that can be monitored. The same crack in a shower floor or behind a bathroom splashback is a water ingress risk that should be addressed promptly — water finding its way under tiles in a wet area damages the waterproofing membrane, substrate, and eventually the structural framing behind. For the full requirements around wet-area protection, see our waterproofing before tiling Melbourne guide.
Cracked Tile Repair Melbourne: Repair vs Replace
A cracked tile is the most common tile repair call Ali Star Tiling receives from Melbourne homeowners. The key question is always: can this tile be repaired in place, or does it need to be removed and replaced?
When a Cracked Tile Can Be Repaired
Hairline cracks — fine surface cracks that have not penetrated through the full tile thickness — can sometimes be filled with a colour-matched tile filler or epoxy compound for a cosmetic repair. This is appropriate only in dry areas (living rooms, hallways) where the crack poses no water ingress risk. The repair is visible on close inspection but minimises the disruption and cost of tile removal.
In wet areas — shower walls, bathroom floors, kitchen splashback — a hairline crack is not a cosmetic problem. It is a potential pathway for water to reach the substrate. In these locations, even a hairline crack should be assessed by a tiler to determine whether the tile needs to be replaced.
When a Cracked Tile Must Be Replaced
- Full breaks or multiple cracks. A tile that is broken into pieces or has multiple crossing cracks has lost its structural integrity. It must be removed and replaced.
- Any crack in a wet area. Cracks in shower floors, bathroom floors, around baths, or on splashback surfaces represent a water ingress risk and should be replaced rather than filled.
- Cracked tile with a hollow sound. A cracked tile that also sounds hollow when tapped has likely debonded from the substrate below. Filling the crack achieves nothing if the tile is not adhered — it will continue to move and crack further.
- Cracked natural stone with staining. Stone tiles with cracks that have absorbed water staining are difficult to repair cleanly — the crack typically darkens and the stain is permanent once set into the stone. Where the surrounding stone has also dulled, see our tile polishing prices Melbourne guide to restore its shine after repair.
The Single Tile Replacement Process
Replacing a single cracked tile in Melbourne without disturbing the surrounding installation is skilled work. The process involves:
- Grout removal. The grout joints around the cracked tile are carefully ground or cut out using an oscillating multi-tool or grout saw. This releases the tile from the surrounding field without cutting into adjacent tiles.
- Tile removal. The cracked tile is carefully broken up and chiselled out in sections. The objective is to remove all tile fragments and old adhesive without cracking the adjacent tiles. This is the most skill-dependent step: excessive force or incorrect tool use cracks neighbouring tiles.
- Substrate inspection. Once the tile is out, the substrate is inspected. In a wet area, the waterproofing membrane is checked for damage. If the membrane has been compromised — either by the original crack or during removal — it must be repaired before the new tile goes in. Our bathroom waterproofing Melbourne guide explains what compliant membrane repair involves.
- New tile fixed. The replacement tile is adhered with the appropriate adhesive for the location. In wet areas, a flexible polymer-modified adhesive is used. The tile is set at the same height as the surrounding tiles and aligned with the existing grout joints.
- Regrouting and silicone. Once the adhesive has cured, the grout joints are refilled with colour-matched grout. In wet areas, the internal corners around the replaced tile are also resealed with silicone.
Q: How much does it cost to replace a single cracked tile in Melbourne?
A: Replacing a single cracked tile in Melbourne typically costs $150–$350 for the labour, depending on the tile location (floor vs wall), ease of access, and whether substrate or waterproofing repair is required. The replacement tile is an additional cost — matching an existing tile can sometimes be difficult if the original is discontinued. Ali Star Tiling assesses all tile repair jobs on-site before quoting. Call 0455 233 816 for a free assessment across Melbourne's western and northern suburbs.
Hollow Tiles Melbourne: What Causes Them and What to Do
Tap any tile in your Melbourne home with your knuckle. A solid, well-bonded tile produces a clear, ringing sound. A hollow tile produces a dull, drum-like thud — a sound that means the tile is no longer fully adhered to the substrate beneath it.
What Causes Hollow Tiles
- Insufficient adhesive coverage at installation. The most common cause. Australian Standard AS 3958.1 requires 80% adhesive coverage for dry area floor tiles and 95% for wet area tiles. Tiles installed with spot-fixing, dot-and-dab, or inadequate notched trowel application leave voids beneath the tile surface. Over time, the tile flexes slightly under foot traffic, the adhesive bond at the contact points stresses, and the tile gradually debonds. This is a latent defect from the original installation.
- Substrate movement. In Melbourne's older homes, particularly those on clay soils in the western suburbs, seasonal ground movement causes concrete slabs to shift slightly. If this movement exceeds what the tile adhesive can accommodate (more than what a flexible adhesive allows), the adhesive bond breaks and the tile becomes hollow.
- Adhesive failure over time. Rigid cement-based adhesives used in older Melbourne tile installations become brittle over years and eventually lose adhesion — particularly in wet areas where thermal cycling and moisture exposure accelerate the process.
- Impact damage below the surface. A heavy impact directly above a tile can crack the adhesive bond without visibly cracking the tile itself. The tile looks intact but sounds hollow and will eventually crack under continued traffic.
When Hollow Tiles Need to Be Addressed
A single hollow tile in a dry living area that is otherwise intact can sometimes be monitored; it is an aesthetic and long-term durability concern but not an immediate emergency. Multiple hollow tiles, or any hollow tile in a wet area, should be addressed promptly:
- Multiple hollow tiles in a wet area. A bathroom or shower floor with several hollow tiles has a compromised installation. Water finding its way under hollow tiles in a wet area reaches the substrate — and waterproofing the damaged compounds quickly once moisture is involved.
- Hollow tiles near edges or transitions. Tiles at room edges, around floor wastes, or at thresholds are more likely to be stepped on at an angle or subjected to leverage forces. Hollow tiles in these positions are at higher risk of cracking than hollow tiles in the middle of a field.
- Hollow tiles with cracked grout joints. If the grout joints around a hollow tile are also cracking, the tile is moving under foot traffic. This movement will crack the tile and adjacent grout progressively if not addressed.
How Hollow Tiles Are Fixed
There are two approaches depending on the severity and scale:
- Injection repair (for isolated hollow tiles with intact grout). A small hole is drilled through the tile, epoxy adhesive is injected under pressure to fill the void, and the drill hole is filled. This is a minimally invasive repair suitable for a single hollow tile where the grout joints are intact and there is no moisture concern. It is not appropriate for wet areas or for tiles with cracked grout.
- Removal and relay (for significant hollow areas or wet zone tiles). The hollow tile is removed, the substrate is inspected and prepared, and the tile is relaid with correct full-coverage adhesive. In wet areas, waterproofing under the hollow section must also be confirmed before relay.
Q: What does it mean if my floor tiles sound hollow in Melbourne?
A: A hollow sound when tapping floor tiles indicates the tile has debonded from the substrate below — typically caused by insufficient adhesive coverage at installation, substrate movement, or adhesive failure over time. Hollow tiles in dry areas can sometimes be monitored but should be repaired before they crack under traffic. Hollow tiles in wet areas (bathroom, laundry) should be addressed promptly as debonded tiles allow water ingress to the substrate. Ali Star Tiling assesses hollow tiles across Melbourne and can advise on injection repair vs full removal and relay.
Regrouting Melbourne: When Grout Fails and What to Do About It
Grout failure is the most visible tile deterioration in Melbourne bathrooms and kitchens — and one of the most under-addressed. Homeowners often live with discoloured, cracked, or crumbling grout for years without realising that regrouting can restore a tired-looking tiled space to near-new condition without replacing a single tile.
Signs Your Melbourne Tiles Need Regrouting
- Grout is cracking or crumbling. Grout joints that are physically breaking apart have lost their integrity. This is both an aesthetic problem and a functional one — in wet areas, crumbling grout is an open pathway for water to reach the substrate.
- Grout has gone black and cleaning does not help. Black grout in showers is usually mould — not dirt — that has penetrated the grout surface. Once mould has penetrated deeply into porous cement grout, cleaning products remove the surface layer but not the mould within the grout body. The only permanent solution is grout removal and replacement.
- Grout lines are physically missing in sections. Missing grout — particularly in wet areas — is an immediate water ingress risk. Tile adhesive is not waterproof; only the grout and waterproofing membrane together create a watertight tiled surface.
- Grout has shrunk away from the tile edges. Grout that has pulled away from the sides of tiles over time creates a gap where water, soap residue, and mould accumulate. This occurs more often with shrinkage-prone cement grout in older Melbourne bathrooms.
- Grout colour has changed permanently. Some grout staining — particularly from hard Melbourne water calcium deposits or iron-rich water — permanently changes the grout colour in ways that cleaning cannot reverse. Regrouting with a new colour or a more stain-resistant product is the only solution.
The Regrouting Process
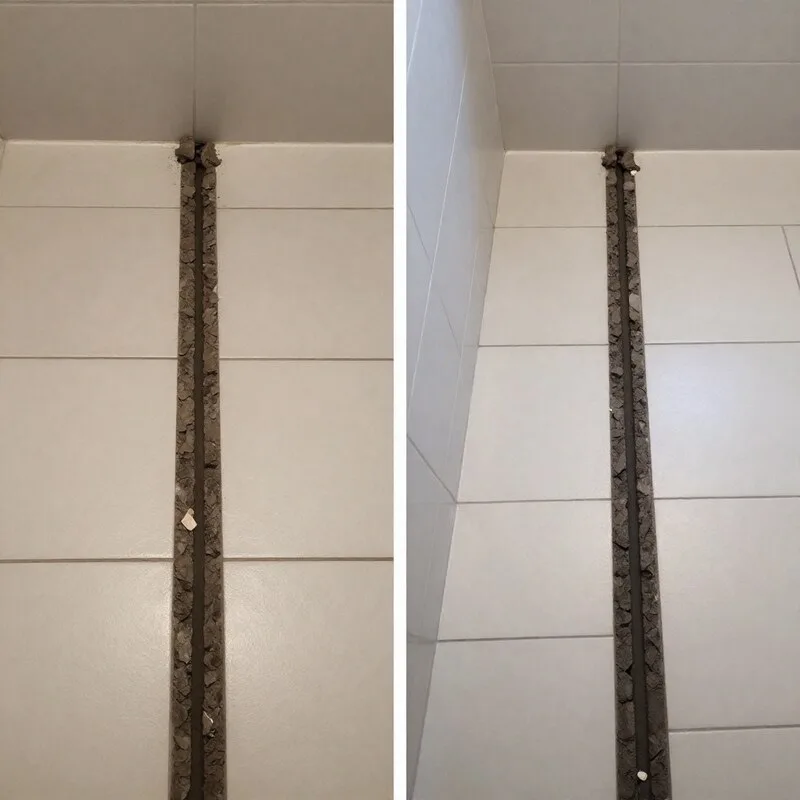
- Existing grout removal. Old grout is removed from the joints using an oscillating multi-tool with a grout removal blade, a manual grout saw, or a dedicated grout removal tool. The objective is to remove grout to a depth of at least 2–3mm without scratching the tile face. This is the most time-consuming step — a full bathroom regrouting typically requires half a day of grout removal alone.
- Joint cleaning. Once the old grout is removed, the open joints are vacuumed and cleaned to remove all dust and residue. Any remaining old grout fragments are removed and the joint edges are checked for damage.
- New grout application. Fresh grout is mixed and applied to the joints using a rubber float, working at 45 degrees to the joint direction. Excess grout is removed from the tile face before it sets. In wet areas, the grout type (sanded, unsanded, or epoxy) is matched to the joint width and the area's requirements.
- Curing and sealing. New cement-based grout requires 24–72 hours to cure before the tiled surface is wet. Once cured, a grout sealer is applied to protect light-coloured grout from future staining — particularly important in kitchen and bathroom applications in Melbourne's hard water areas.
Q: How much does regrouting cost in Melbourne?
A: Regrouting a standard Melbourne bathroom — removing existing grout and applying fresh grout to floor and wall tiles — typically costs $400–$900 in labour depending on bathroom size and tile format. Smaller jobs (single shower or splashback regrouting) start from $200–$400. Epoxy grout, which is more stain-resistant but harder to apply, costs more in labour than standard cement grout. Ali Star Tiling provides free on-site regrouting assessments and quotes across Melbourne's western and northern suburbs. For a full renovation budget comparison, see our bathroom tiling cost guide for Melbourne.
Silicone Replacement Melbourne: The Most Overlooked Maintenance Job
Silicone joints are present in every correctly installed tiled wet area in Melbourne — at internal corners where two tiled surfaces meet, at the junction between the floor tiles and the bath or shower base, and at the junction between the splashback tiles and the benchtop. These joints are designed to accommodate the small amount of movement that occurs in every building as it responds to temperature and moisture changes. Unlike rigid grout, silicone flexes without cracking.
The problem is that silicone has a finite life. In a Melbourne bathroom with daily shower use, silicone joints typically last 5–10 years before they begin to show one or more of these failure signs:
- Mould penetration. Black mould on the surface of silicone is the most visible sign. Cleaning removes the surface mould temporarily but once mould penetrates the silicone body, cleaning only removes the visible layer while the root remains. Discoloured silicone that keeps going black after cleaning needs to be replaced.
- Silicone pulling away from the tile or surface. As silicone ages, it loses adhesion at the edges. A joint that has pulled away from one surface is no longer waterproof; at that edge, water runs directly behind the silicone and into the substrate.
- Silicone cracking. Aged silicone loses flexibility and cracks under the movement it was installed to accommodate. A cracked silicone joint in a wet area is an open water pathway.
- Silicone shrinkage. Some lower-quality silicone products shrink over time, creating a gap between the bead and the tile surface even without visible pulling away.
The Silicone Replacement Process
- Old silicone removal. The existing silicone is cut and pulled out using a silicone removal tool or sharp blade. All residue must be removed from both surfaces; silicone will not bond to old silicone residue. This step requires patience and care to avoid scratching tiles or damaging grout joints adjacent to the silicone bead.
- Surface preparation. Both surfaces (the two tiled faces at a corner, or the tile and the bath/benchtop surface) are cleaned with isopropyl alcohol or a silicone primer to remove all grease, soap residue, and contamination that would prevent adhesion.
- Masking. Masking tape is applied to both sides of the joint to produce a clean, straight silicone bead. Professional silicone application with masking produces a result that is indistinguishable from the original finish. Unmasked application typically produces an uneven, finger-smeared result.
- New silicone application and tooling. Fresh silicone is applied in a continuous bead and tooled smooth while wet. The masking tape is removed immediately, before the silicone skins. The joint is left undisturbed for the cure period specified by the silicone manufacturer — typically 24 hours minimum before water contact.
Q: How often should silicone be replaced in a Melbourne bathroom?
A: Silicone joints in a Melbourne bathroom typically last 5–10 years before showing signs of mould penetration, adhesion failure, or cracking. A bathroom that sees heavy daily use — particularly a household with multiple users — will reach the end of silicone life at the lower end of this range. When black mould persists despite cleaning, or when silicone is visibly pulling away from surfaces, replacement is required. Ali Star Tiling replaces silicone joints in Melbourne bathrooms as a standalone job or as part of a broader regrouting or repair scope.
Repair vs Full Retiling: How to Make the Right Decision
The question Melbourne homeowners most frequently ask when tiles start showing problems is whether to repair or fully retile. The answer depends on several factors that a professional tiler can assess on-site:
| Situation | Recommendation | Reason |
|---|---|---|
| 1–3 cracked tiles, remainder bonded and sound | Single tile replacement | Minimal disruption. Cost-effective if matching tiles can be sourced. |
| Widespread hollow tiles (>20% of floor area) | Full retile | Systematic adhesive failure — individual repairs will continue to fail. Better to address the root cause. |
| Grout failed throughout bathroom | Regrouting | If tiles are intact and well-bonded, regrouting restores the installation without full retile cost. |
| Cracked grout AND hollow tiles in wet area | Full retile | Two simultaneous failure modes suggest substrate or waterproofing issues that repair will not resolve permanently. |
| Silicone failed, grout and tiles intact | Silicone replacement only | The most straightforward repair — no tile removal required. |
| Tiles more than 15–20 years old with multiple issues | Full retile | End-of-life installation. Accumulating repairs are less cost-effective than a fresh start with correct installation. |
| Single crack in wet area with waterproofing concern | Tile replacement with waterproofing inspection | Wet area crack always requires membrane check — repair scope may expand once tile is removed. |
Q: Should I repair or retile my Melbourne bathroom?
A: The right answer depends on the extent and cause of the tile problem. Single cracked tiles with a sound surrounding installation are worth repairing. Widespread hollow tiles (over 20% of the floor) or simultaneous grout and tile failure suggest a systemic installation problem that individual repairs will not permanently resolve — full retiling is more cost-effective in the long run. A professional on-site assessment by Ali Star Tiling across Melbourne's western suburbs identifies the root cause and gives you an honest recommendation on repair vs retile. Call 0455 233 816 to arrange a free assessment. For a full step-by-step retiling scope, see our bathroom renovation tiling Melbourne guide, or explore our bathroom tiling services in Melbourne.
Tile Repair Costs Melbourne: What to Budget in 2026
| Repair Type | Typical Cost Range | Notes |
|---|---|---|
| Single tile replacement (dry area) | $150–$280 | Labour only. Add tile supply cost if matching tile is needed. |
| Single tile replacement (wet area + waterproofing check) | $200–$400 | Higher due to waterproofing inspection and potential membrane repair. |
| Multiple tile replacement (3–10 tiles) | $350–$800 | Economy of scale vs single tile — less mobilisation cost per tile. |
| Hollow tile injection repair | $80–$200 per tile | For dry area isolated hollow tiles with intact grout — minimally invasive. |
| Full bathroom regrouting (floor + walls) | $400–$900 | Grout removal + fresh grout application. Tile supply not involved. |
| Shower regrouting only | $200–$450 | Smaller scope than full bathroom. |
| Splashback regrouting | $150–$350 | Kitchen or bathroom splashback — typically 3–6m². |
| Silicone joint replacement (single bathroom) | $150–$300 | All internal corners + bath/shower base + benchtop junction. |
| Combined regrout + silicone replacement | $450–$950 | Most common combined repair scope in Melbourne bathrooms 10+ years old. |
These are indicative Melbourne metro ranges for 2026. Matching discontinued tiles adds time and potential sourcing cost to repair jobs. Ali Star Tiling provides free on-site assessments and written quotes for all tile repair work — call 0455 233 816 or email alistartiling@yahoo.com.
Regrouting to fix a colour you regret? Our grout colour guide Melbourne explains how to choose a colour that won't need changing again.
Hiring for a bigger job instead of a repair? Our how to choose a tiler in Melbourne guide covers the questions to ask before you book.
Need tile repair in Melbourne? Call Ali Star Tiling on 0455 233 816 or email us for a free assessment. We repair cracked tiles, regrout, replace hollow tiles, and reseal silicone across Melbourne's western and northern suburbs. Mon–Sat 7am–6pm.
FAQs